Fashion Ad Video Using AI-A Simple Guide for Beginners
If you’ve ever wanted to promote fashion items online but didn’t have a proper photoshoot, a camera crew, or even a video editor—don’t worry, I’ve been there too.
Recently, I got my hands on some beautiful outfits from a local store. They looked elegant and fresh, but all I had were a few still images. No model shoots. No fancy background setup. Just clean, royal photos taken in a simple way.
I wanted to share them on YouTube, LinkedIn, and TikTok, but how could I create a professional-looking video without a team or software?
Let me walk you through exactly how I did it. This post will help you if you’re:
A small business owner
A beginner content creator
Someone trying to build a brand on social media
Or just curious about creative video-making without editing skills
Let’s get started.
The Idea: Turn Basic Photos Into Scroll-Stopping Videos
You don’t need high-end equipment to get attention online anymore. What really matters is how you present your message.
I wanted to say:
“Welcome to our fashion premieres. Do you want to know how to style your wardrobe? Explore our new Curta collection.”
That line became the voice of the ad.
Instead of planning a costly photoshoot, I decided to use the images I already had and turn them into a complete video story—with voiceover, animations, transitions, and music.
No software installations, no editing timeline confusion—just a web-based tool that does the job in a few clicks.
The Tool I Used (No, This Isn’t a Sponsored Post)
You might be expecting me to name some expensive app. But no, this was something simple and beginner-friendly.
The tool works directly from your browser. You don’t need to install anything. And yes, there’s a free version that gives you enough credits to experiment and even make full videos.
Here’s how it works from start to finish.
Step-by-Step: How I Made My Fashion Video Using Just Images and Text
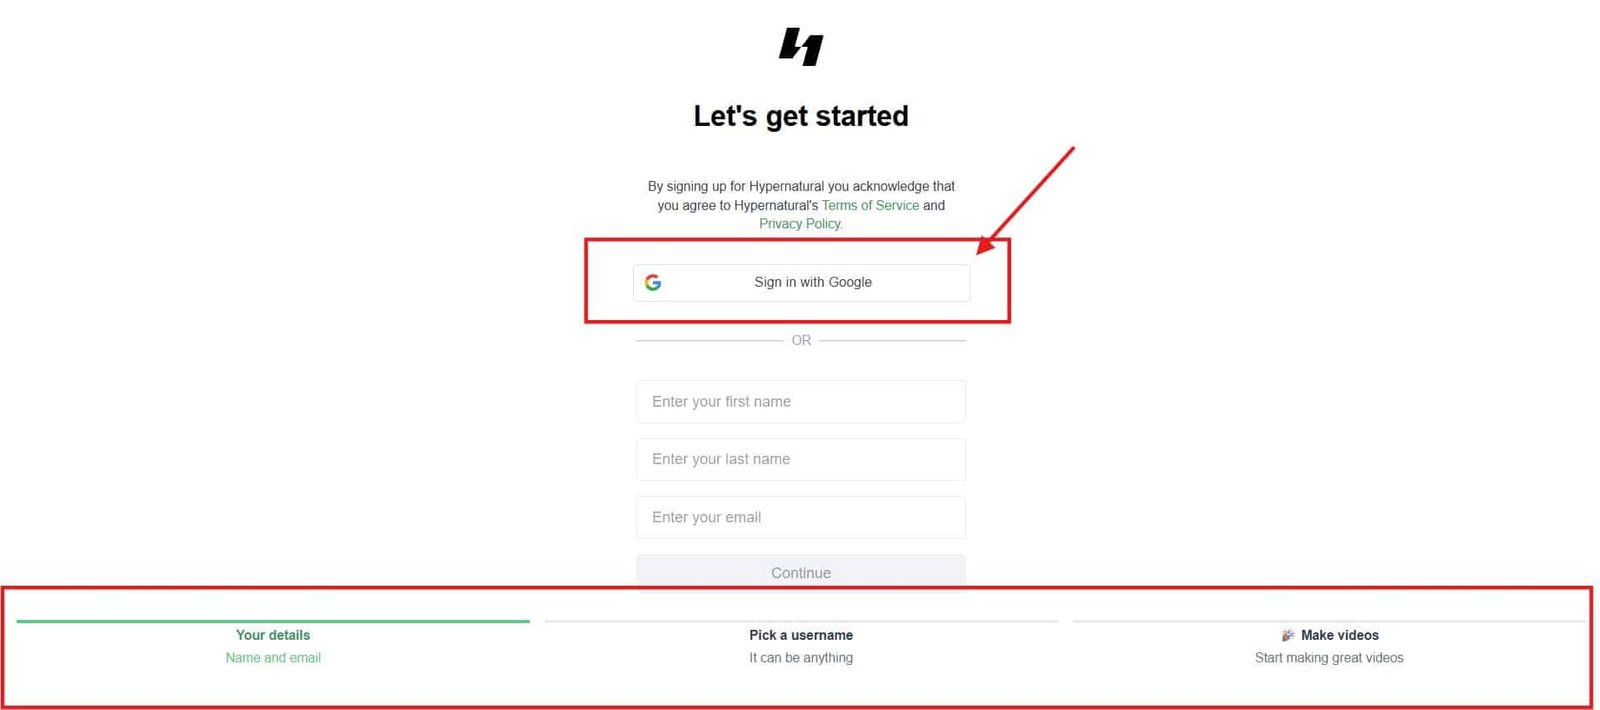
1. Sign Up on the Tool’s Website
First, I went to the tool’s homepage
I clicked on Sign up for free and logged in using my Google account.
In less than a minute, I was inside the dashboard.
2. Start With a Script
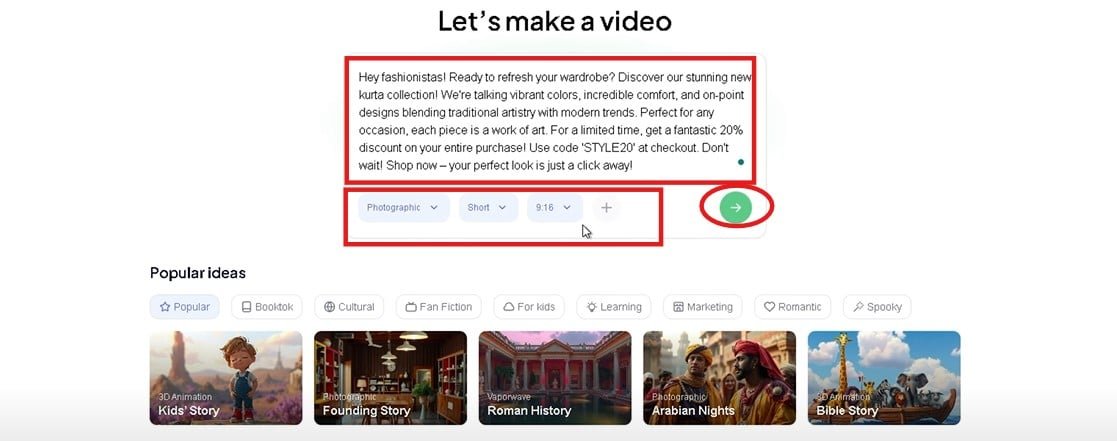
There’s a big box in the center of the screen where you enter your content.
Since I already had a script in mind for the fashion ad, I pasted it there. But you can type freely too. For example:
“Welcome to our fashion premieres. Explore our new Curta collection—featuring colors, comfort, and class like never before.”
3. Choose Style, Length, and Aspect Ratio
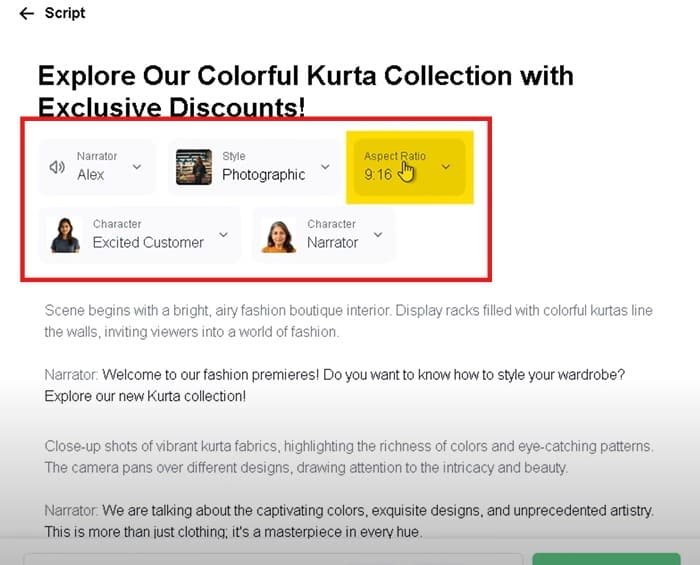
This part helps the tool understand what kind of video you’re aiming for. I chose:
Style: Something elegant and classy
Length: Around 30–40 seconds (perfect for social media)
Aspect Ratio: Vertical (for TikTok and Instagram) and horizontal (for YouTube and LinkedIn)
4. Add Your Own Voice or Use a Voiceover
Now comes the fun part—adding a voice to your video.
There are three ways to do this:
Record your own voice inside the tool
Upload a voiceover file
Use the tool’s built-in voice generator
I tried their free voice option, which sounded decent. But they also have more natural-sounding voices in the paid version. Still, for my purpose, the free voice worked well.
Making the Video Come to Life
Once you click the arrow button to continue, the tool takes your script and starts building the video scene-by-scene. This takes a few minutes.
It automatically picks characters, animations, transitions, and images (if you don’t upload your own). In my case, I replaced their images with the fashion photos I had.
Here’s how I customized it.
Customizing Your Video (Even With No Experience)
1. Replacing Images
If you want to swap an image:
Click on the image in the timeline
Go to the Asset section
Upload your photo
Hit “Replace Current Image”
Done. Your scene now has your own product or collection shot.
2. Editing the Script (Optional)
You can click on the script box and rewrite any line. Then just hit “Update” and the scene will refresh. This is great if you want to tweak the wording after watching the draft.
3. Animating the Images
To add some motion to your images:
Click the Animate button
Choose from options like Clean AI or SVG AI
These give your still photos some smooth zoom or pan effects
It costs a few credits, but it’s totally worth it
4. Adjusting Transitions and Effects
Want to change how scenes move or feel?
Click on an image
Use the right-side panel to change:
Caption style
Background effect
Scene speed
Entry/Exit transition
It’s very simple to control and you see the preview immediately.
Adding Branding: Logo, Titles, and Captions

Branding matters.
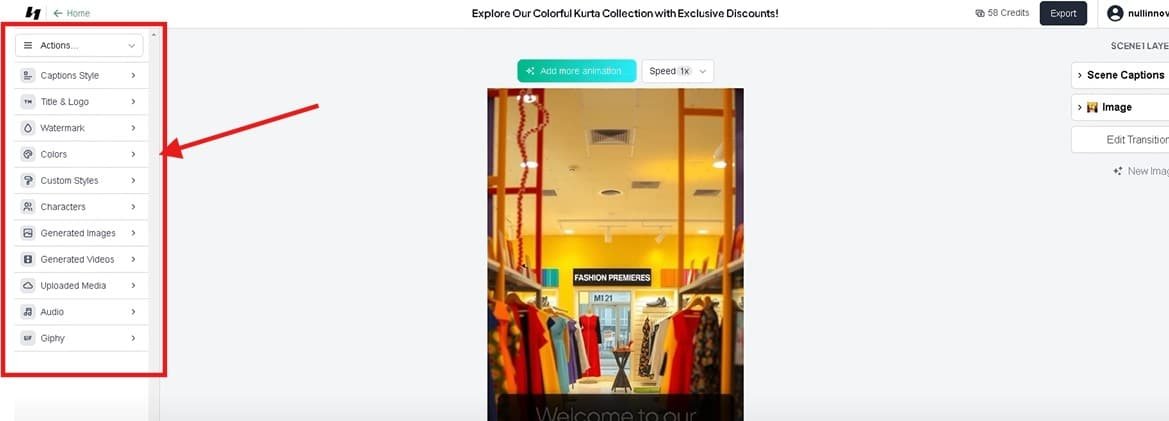
Inside the left panel, you’ll see options to:
Upload your logo
Add a custom title
Change caption style and color
Remove the tool’s watermark (only on paid plan)
Even the caption font and placement can be adjusted. This helped me match the style to my brand’s vibe.
Exporting the Final Video
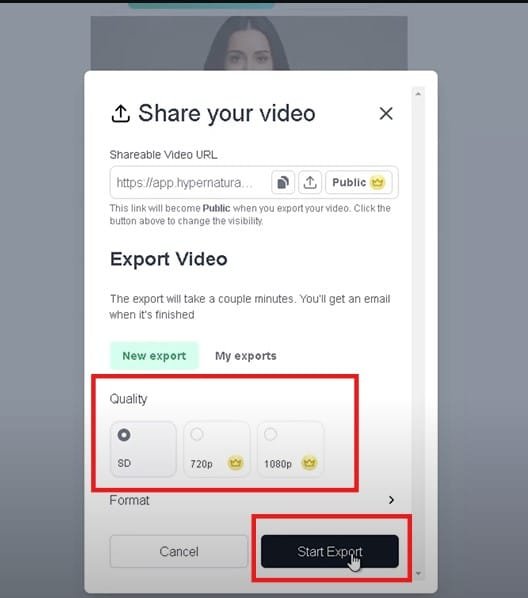
Once everything looked the way I wanted, I hit the Export button on the top right.
You can choose:
Video resolution (720p or 1080p)
Format (MP4 or others)
Whether you want subtitles included
After a few minutes, the download was ready—and just like that, my fashion video ad was complete.
No editing software. No extra cost. No stress.
My Final Video Looked Like This:
“Welcome to our fashion premieres.
Do you want to know how to style your wardrobe?
Explore our new Curta collection.
We’re talking about captivating colors, rich fabrics, and timeless designs.”
It included smooth transitions, voiceover narration, moving images, and clean branding—all from just a few pictures.
Bonus Feature: Auto Shorts and Story Content
There’s one more thing I loved about this tool.
You can upload a full YouTube video or podcast, and it will automatically create short-form content out of it—perfect for:
Instagram Reels
YouTube Shorts
TikTok videos
This means you can repurpose long videos into several small clips for marketing. You don’t have to manually cut, resize, or edit anything.
If you’re someone who creates long content, this feature alone can save you hours.
Who Should Try This?
Whether you’re:
A small clothing store owner
A digital creator with limited tools
A startup with no media team
Or just someone experimenting with online branding
…this method can help you create high-quality, professional-looking content using what you already have.
It’s fast, affordable, and surprisingly easy to learn.
Final Thoughts: Content Creation Shouldn’t Be Complicated
The world of marketing has changed.
You no longer need a DSLR, lighting crew, editor, and studio. With a few good product shots and the right tool, you can create brand stories that get attention online.
That’s what I did with my Curta fashion collection, and it’s only the beginning.
If you’re someone who wants to build a strong presence online—especially in fashion, lifestyle, or e-commerce—start using tools that make your life easier.
You don’t need to be a pro editor. You just need to get started.
What’s Next?
✅ Related Read: Use AI to Turn Your Ideas Into Stunning Videos — Learn how to go from idea to polished video in minutes using AI tools.
If you want to see:
How to create YouTube Shorts from long videos
How to use this tool for product storytelling
Or how to create Instagram-style story visuals
Leave a comment or message me, and I’ll make a full tutorial on that next!







Hi there, I found your site via Google while looking for a related topic, your site came up, it looks great. I’ve bookmarked it in my google bookmarks.
Neat blog! Is your theme custom made or did you download it from somewhere? A theme like yours with a few simple adjustements would really make my blog jump out. Please let me know where you got your design. Thanks
I am often to running a blog and i actually respect your content. The article has really peaks my interest. I’m going to bookmark your site and hold checking for new information.