How to Use Replay AI to Isolate the Main Singer:
Hey there! I’ve been absolutely OBSESSED with Replay lately. Last weekend, I spent way too many hours playing with this incredible free tool, and I just had to share my experience with you all. If you’re into music production, voice conversion, or just love the idea of hearing your favourite songs performed by different voices, you’re going to want to read this entire guide.
Let me tell you – I was sceptical at first. I’ve tried so many voice isolation tools that promised the moon but delivered… well, not much. But Replay? It’s a game-changer. The ability to isolate the main singer’s voice from any track and replace it with virtually any other voice is mind-blowing, especially since it’s completely FREE.
So grab a coffee (you’ll need it – this guide is comprehensive), and let’s dive into the magical world of Replay AI!
What Made Me Fall in Love with Replay
Before we get into the nitty-gritty details, let me share why I’m so excited about this tool. As someone who’s spent years working with various audio software, I’ve always been frustrated by how complicated vocal isolation and replacement can be.
You typically need:
- One tool to download audio
- Another to separate stems
- Yet another for voice conversion
- And finally something to mix it all back together
It’s a headache! But Replay does ALL of this in one simple interface. It even downloads YouTube videos and processes them automatically!
The first time I saw the isolated vocals come out clean and then transform into a completely different voice, I literally said “No way!” out loud. My cat gave me a judgmental look, but I didn’t care – I was too busy converting every song I could think of.
Getting Started with Replay
System Requirements & Installation
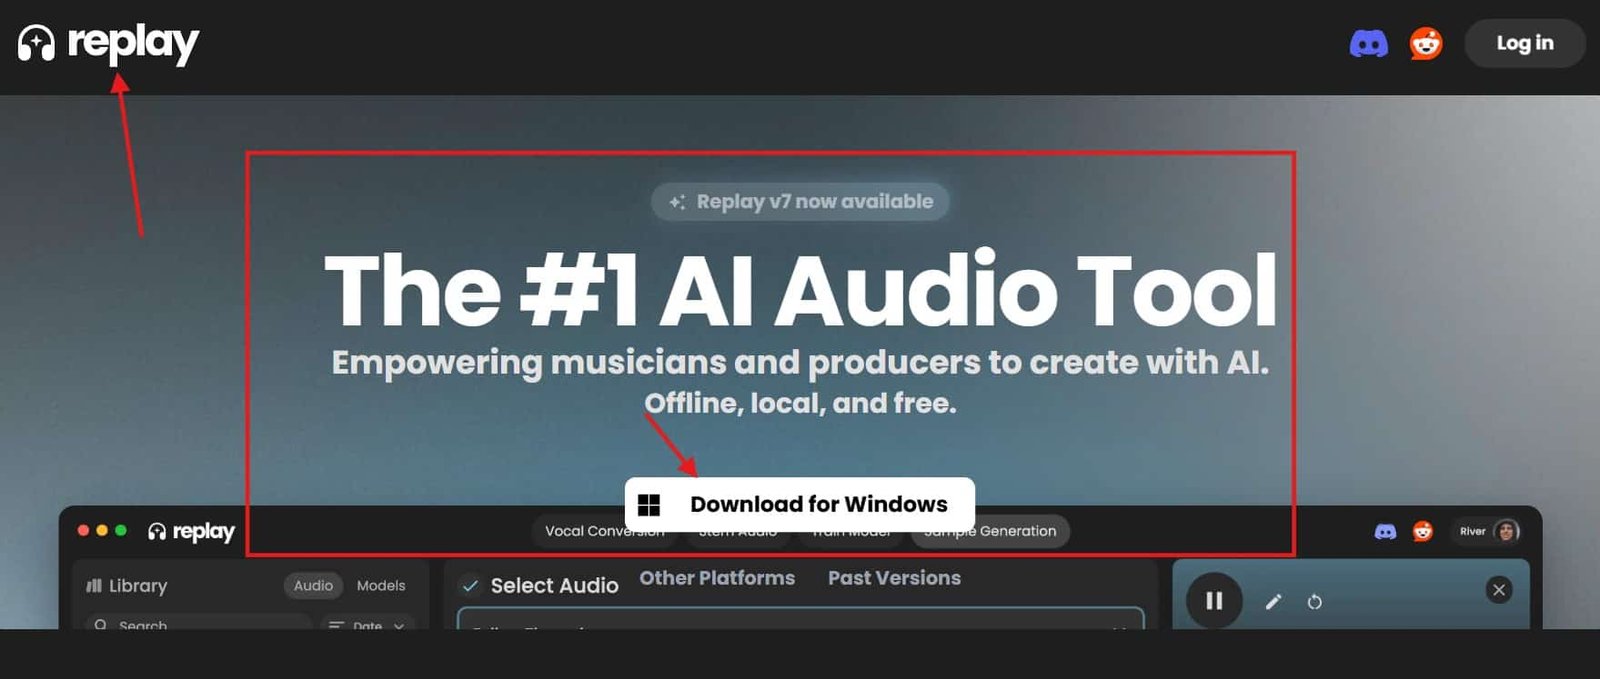
First things first, you’ll need:
- A decent computer (nothing crazy, but more RAM is better)
- Windows, Mac, or Linux OS
- About 2GB of free space
- Patience for the initial model downloads
Installing Replay is surprisingly straightforward:
- Head over to tryreplay.io
- Download the version for your operating system
- Run the installer
- Launch the application
When you first open it, the interface might seem a bit empty. That’s because you need to get some voice models first. But don’t worry – I’ll walk you through that next!
Finding and Installing Voice Models: My Experience
This is where the fun begins! Replay uses voice models from a website called Weights.gg, which hosts thousands of free voice models uploaded by the community.
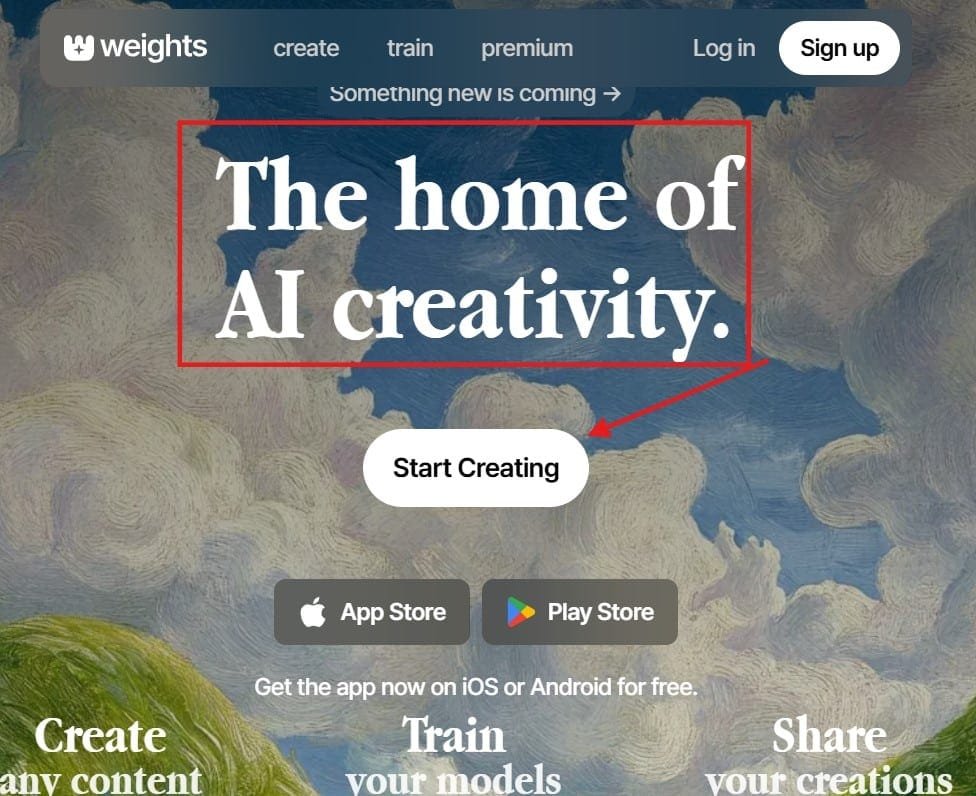
Here’s how I navigated this process:
- Visit Weights.gg
- Create a free account (I used my Google account for simplicity)
- Click the search icon and type in a singer or character
The first time I did this, I searched for “Frank Sinatra” (I’m a sucker for the classics). I found a few different models, listened to the samples, and downloaded the one that sounded most authentic.
When you download a model, you’ll get a ZIP file containing typically two files:
- A
.pthfile (the actual voice model) - An
index.jsonfile (configuration data)
Pro tip from my experience: I created a dedicated “Voice Models” folder on my desktop, and I rename all the files before adding them to Replay. Instead of keeping the generic “model.pth” name, I rename them to something like “FrankSinatra.pth” and “FrankSinatra.index” for easy identification.
To add the model to Replay:
- Extract the ZIP file
- Rename the files (optional but recommended)
- Drag and drop the
.pthfile into Replay - The model will appear in your voice selection dropdown
When I first started, I went a bit crazy and downloaded about 25 different voice models in one sitting. From Freddie Mercury to SpongeBob SquarePants (yes, really), the variety is incredible!
Real-World Example: Converting My First Song
Let me walk you through my first successful conversion using Replay. I had an MP3 of Adele’s “Someone Like You” that I wanted to transform using a male voice model.
Step 1: Preparing and Importing the Audio
I dragged the MP3 directly into Replay’s main interface. The program automatically recognized the file and showed a waveform visualization. I clicked the play button to make sure it was the right track, and sure enough, Adele’s powerful vocals filled my room.
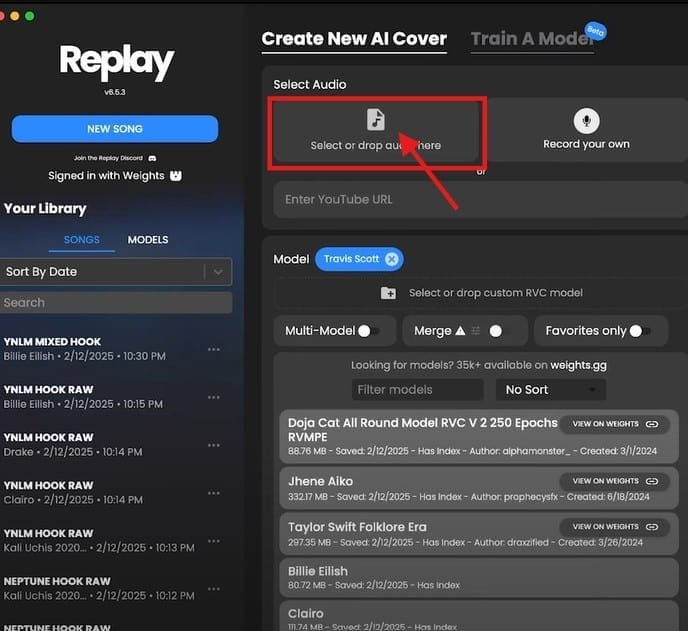
Step 2: Selecting a Voice Model
From my newly downloaded collection, I selected a Johnny Cash voice model. Talk about a dramatic change! I figured going from Adele to Johnny Cash would really put Replay to the test.
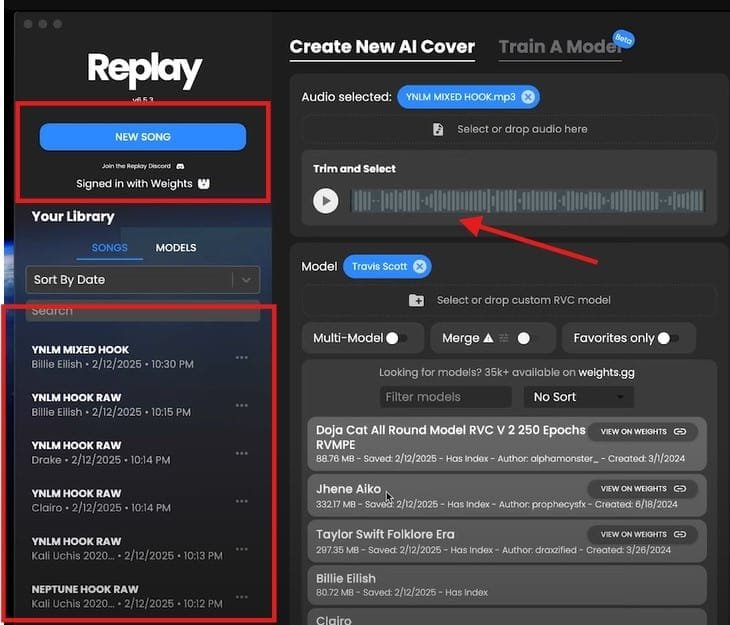
Step 3: Adjusting Settings for Optimal Results
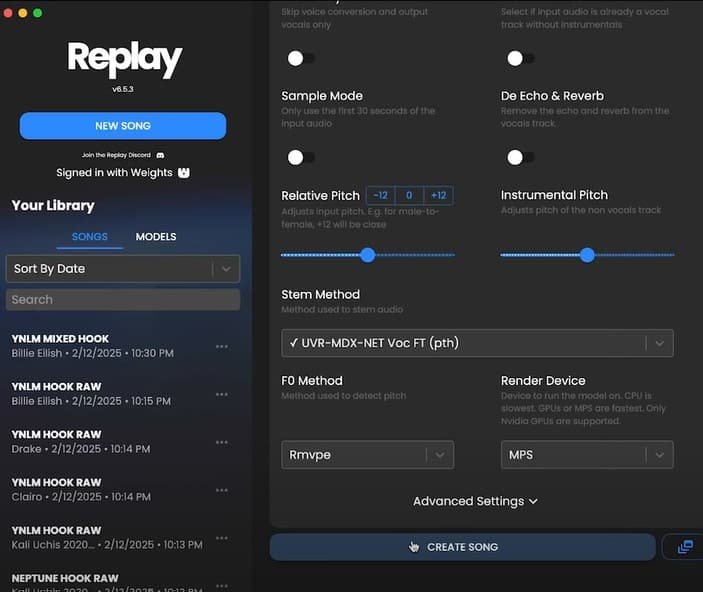
Since I was converting from a female to a male voice, I needed to adjust the pitch settings. In Replay, this is managed through the “Relative Pitch” setting.
I set it to -12 (one octave down) since Adele sings much higher than Johnny Cash’s iconic deep voice.
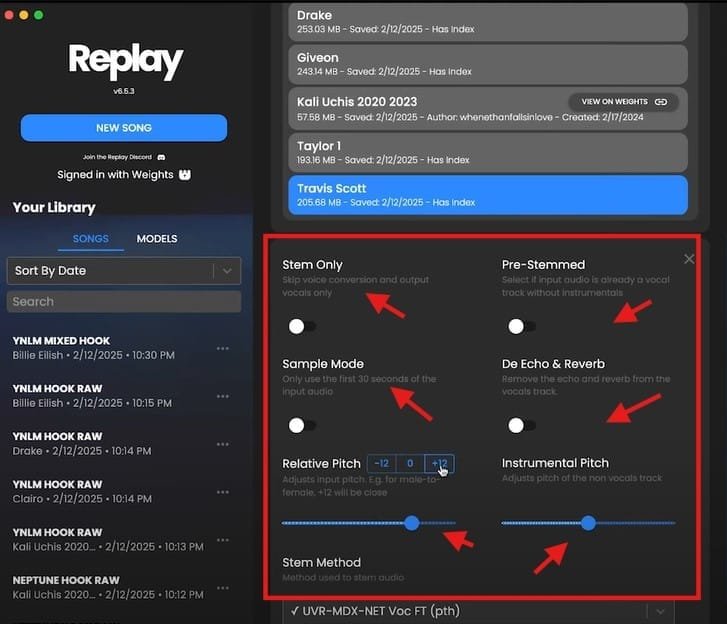
Step 4: Processing the Song
Then came the moment of truth. I clicked “Create Song” and watched as Replay worked its magic. The first time you process a song, it takes a bit longer because the program needs to separate the vocals from the instrumental track.
On my fairly standard PC, this took about 3 minutes for a 4-minute song. The progress bar showed multiple stages:
- Separating audio tracks (this took the longest)
- Loading the voice conversion model
- Processing the conversion
- Creating the final audio
Step 5: The Result
When the processing finished, the new version played automatically, and I was genuinely shocked. Johnny Cash was now “singing” Adele’s heart-wrenching ballad with his distinctive deep timbre. While not 100% perfect (some phrases had slight artifacts), overall the quality was impressive!
Replay also gave me options to:
- Download the full converted song
- Download just the converted vocals
- Download just the instrumental track
- Download the original isolated vocals
I downloaded both the full mix and the separate tracks so I could tweak them further in my DAW.
If you’re interested in understanding the broader implications of AI on the job market, check out our detailed article on Will AI Create More Jobs Than It Destroys? for an in-depth analysis.
Beyond the Basics: Advanced Techniques
After spending a weekend obsessively playing with Replay, I discovered some advanced techniques that significantly improved my results.
Using YouTube Links Directly
One of my favorite features is the direct YouTube integration. Instead of downloading videos separately, you can just:
- Copy a YouTube URL
- Click the YouTube icon in Replay
- Paste the URL
- Select your voice model
- Click “Create Song”
I tested this with a lesser-known indie song that I didn’t have in my library, and within minutes, I had the lead singer’s voice replaced with Billie Eilish’s distinctive vocal style. The convenience factor here is off the charts!
Multi-Model Processing: Batch Converting Multiple Voices
Once you get comfortable with Replay, you’ll want to try different voices on the same song. Rather than repeating the process manually, use the Multi-Model feature:
- Click “Multi-Model”
- Select multiple voice models
- Click “Create Song”
Replay will process each voice sequentially and provide separate results for each one. I used this to compare how five different female vocalists would sound singing the same Bruno Mars song. It was fascinating to hear the subtle differences in timbre and interpretation that each model brought to the exact same source material.
Voice Merging: Creating Unique Hybrid Voices
This feature blew my mind. Replay allows you to merge two different voice models to create a hybrid voice. I tried combining Freddie Mercury with Elvis Presley, and the result was a unique vocal character that had elements of both legendary singers.
Here’s how to do it:
- Enable “Multi-Model”
- Select exactly two voice models
- Click “Merge”
- Use the slider to adjust the balance between the two voices
- Click “Create Song”
The slider gives you precise control over the blend. Moving it toward one voice will make that voice more dominant in the final mix.
Recording Your Own Voice for Conversion
If you’re curious how you’d sound singing like your favourite artist, Replay has you covered:
- Click “Record Your Own”
- Either record directly through your microphone or import a recording
- Select a target voice model
- Make sure “Pre-Stemmed” is enabled (since your recording doesn’t need vocal separation)
- Click “Create Song”
I recorded myself singing “Happy Birthday” and converted it to sound like Darth Vader. The result was both hilarious and surprisingly convincing! I sent it to my friend on their birthday, and they thought it was the coolest thing ever.
Overcoming Common Challenges
Not every conversion is perfect out of the box. Here are some real challenges I faced and how I overcame them:
Problem 1: Artifacts in the Vocal Conversion
In one of my early attempts, converting a pop song to a character voice, I noticed some robotic artifacts in certain phrases. After some experimentation, I found two solutions:
- Solution A: I tried a different model of the same character that had been trained on more diverse vocal samples.
- Solution B: I exported the converted vocals separately, brought them into Audacity, and applied a very gentle reverb (about 10% wet signal) which helped mask the artifacts.
Problem 2: Mismatched Vocal Range
When I tried to convert a very high female vocal to a deeper male voice, some phrases became unintelligible because the pitch shift was too extreme.
My solution was to find a middle ground by:
- Setting the Relative Pitch to -8 instead of the default -12
- Also adjusting the Instrument Pitch to -4 to make the entire song slightly lower
- This kept the voice recognizable while maintaining the right key relationship with the music
Problem 3: Difficult Vocal Separation
Some songs, especially those with heavy effects or complex arrangements, didn’t separate cleanly. The vocal track contained instrumental elements that affected the conversion quality.
To fix this:
- I found a more acoustic or live version of the same song
- These versions typically have clearer vocal isolation
- The conversion results were much cleaner with the better-separated source material
Taking Your Conversions to the Next Level: My Post-Processing Workflow
While Replay does an amazing job on its own, I’ve developed a simple post-processing workflow that takes the results from good to great:
Step 1: Export Separated Tracks
After conversion, I always export:
- The converted vocals only
- The instrumental track
Step 2: Import into a DAW
I use Adobe Audition, but you can use any DAW like Audacity (free), GarageBand, FL Studio, etc.
Step 3: Clean Up the Vocal Track
I perform a few quick edits:
- Remove any non-vocal sections (beginnings/endings with just noise)
- Apply a high-pass filter around 80Hz to remove rumble
- Apply a gentle noise reduction if needed
Step 4: Apply Subtle Effects
For a more natural sound:
- Add light reverb (I use a small room setting, about 15-20% wet)
- Apply very subtle compression (2:1 ratio, gentle threshold)
- Sometimes a touch of EQ to enhance clarity (slight boost around 3-5kHz)
Step 5: Balance and Export
Finally, I:
- Balance the vocal level against the instrumental
- Pan the vocal slightly (1-2% left or right) for a more spacious sound
- Export as a high-quality MP3 or WAV
This entire post-processing workflow takes me less than 5 minutes once I got the hang of it, but it makes a noticeable difference in the final quality.
Creative Applications Beyond Music
While song conversion is the obvious use case, I’ve found some other creative applications for Replay:
Creating Character Narration for Videos
I used Replay to create a SpongeBob narration for a friend’s birthday video. I recorded myself reading the script, converted it using the SpongeBob model, and layered it over the footage. The result had everyone laughing!
Podcast Intros and Segues
For a podcast project, I created distinctive segues using different character voices announcing the transitions between segments. It added a unique production value that listeners commented on positively.
Voice Acting Experiments
As someone interested in voice acting, I’ve used Replay to experiment with different character voices. By recording my performance and converting it, I can hear how different vocal characteristics affect the delivery and timing of lines.
Ethical Considerations: My Perspective
With great power comes great responsibility. As someone using this technology, I believe it’s important to:
- Always disclose AI-generated content: I never pass off converted vocals as authentic performances by the actual artists.
- Respect copyright: I keep my converted songs for personal enjoyment and educational purposes, not commercial distribution.
- Be mindful of representation: I avoid creating content that could be misleading or potentially harmful if attributed to the wrong person.
Is Replay Right for You?
After extensive testing, here’s my honest assessment of who will benefit most from Replay:
Perfect for:
- Content creators looking to add character voices to projects
- Music producers wanting to test different vocal styles on compositions
- Casual users who enjoy experimenting with audio technology
- Educators teaching about vocal characteristics and music production
- Anyone curious about voice conversion technology
Maybe not ideal for:
- Professional production requiring absolutely perfect, artifact-free vocals
- Users with very outdated computers (processing can be slow)
- Those looking for real-time live performance conversion (it’s not designed for this)
Final Thoughts: Why Replay Has Earned a Permanent Place in My Toolkit
After spending countless hours with Replay, I can confidently say it’s earned a permanent place in my creative toolkit. The ability to isolate the main singer’s voice from any track and transform it into something new opens creative doors I didn’t even know existed.
What impresses me most is how the developers have managed to simplify such a complex technical process. Voice isolation and conversion have traditionally required expensive software and technical expertise, but Replay makes it accessible to anyone.
Is it perfect? No. There are still occasional artifacts, and some voice models work better than others. But considering it’s completely free and runs locally on your machine, the quality is remarkable.
I encourage you to download Replay, find some voice models that interest you, and start experimenting. Whether you’re a serious content creator or just someone who enjoys playing with new technology, I think you’ll be as impressed as I was.
And if you do create something cool with it, I’d love to hear about it in the comments! Just remember to create responsibly and have fun exploring the endless possibilities of voice conversion technology.
Quick Reference Guide: Getting Started with Replay AI
For those who want to jump right in:
- Download & Install:
- Get Replay from tryreplay.io
- Install and launch the application
- Get Voice Models:
- Visit Weights.gg
- Create a free account
- Search for and download voice models
- Extract and drag the .pth file into Replay
- Convert a Song:
- Drag an audio file into Replay OR
- Paste a YouTube URL
- Select your voice model
- Adjust pitch settings if needed
- Click “Create Song”
- Download the result
- Advanced Features:
- Try “Multi-Model” for batch processing
- Experiment with “Merge” to create hybrid voices
- Record yourself and convert your own voice
- Export separate tracks for post-processing
Happy voice converting!
Frequently Asked Questions :
What audio formats can I import into Replay?
Replay supports all common audio formats—including MP3, WAV, FLAC, AAC, and OGG—as well as direct YouTube URLs.
How do I organize dozens of voice models without clutter?
Create a dedicated “Voice Models” folder, rename each .pth/.index pair to descriptive names (e.g. Elvis.pth + Elvis.index), and group them into subfolders by genre or character.
Why does my conversion sometimes sound robotic, and how can I fix it?
Robotic artifacts often stem from extreme pitch shifts or under-trained models. Try a smaller pitch adjustment (e.g. –8 instead of –12), switch to a higher-quality community model, or apply a light reverb post-conversion to smooth rough edges.
Can I merge more than two voice models at once?
No—you can only merge exactly two models at a time. For multi-model experiments, use the “Multi-Model” feature to process them sequentially, then blend the outputs in your DAW.
How do I speed up processing on a slower machine?
Close other CPU/GPU-intensive applications.
Use shorter audio clips or stem the vocals yourself first.
Opt for simpler voice models (fewer parameters) when speed is critical.
Is it possible to convert only a specific section of a song?
Yes—first export the full stems, then in your DAW or audio editor trim to the desired section and re-import that snippet into Replay for conversion.
What’s the best way to find high-quality voice models?
On Weights.gg, look for models with:
Clear waveform samples in multiple genres
High user ratings and download counts
Recent training dates (indicating active maintenance)
Can I use Replay-converted vocals in commercial projects?
Generally no—most community models and the tool itself are licensed for personal, educational, or non-commercial use. Always check each model’s license terms before commercial deployment.
How do I record my own voice and have it sound natural after conversion?
Record in a quiet room with a decent microphone.
Enable “Pre-Stemmed” so Replay skips separation.
Use moderate pitch settings (±4 semitones) to preserve natural inflection.
What should I do if Replay crashes or freezes during processing?
Ensure you have the latest version installed.
Delete any corrupted or partially downloaded model files.
Lower the batch size or avoid “Multi-Model” on very long tracks.
If problems persist, consult the Discord/community forums for log-file support.
How can educators leverage Replay in the classroom?
Demonstrate vocal characteristics by swapping voices on the same passage.
Show real-time pitch and timbre manipulation in music or language lessons.
Encourage creative storytelling by having students convert their own narrations.
Are there any privacy concerns when using Replay?
Because Replay runs locally, your audio never leaves your machine—ensuring full privacy. Just be mindful of copyright when importing commercial tracks


